15 Drill Storage Ideas for 2026 to Organize Your Workshop

Keeping several power drills organized can be challenging when chargers, batteries, bits, and accessories compete for limited workshop space. A practical drill storage system makes tools easier to reach, protects them from accidental damage, and gives every item a designated place. Whether you have a spacious garage or a small DIY corner, these drill storage ideas offer useful ways to create a cleaner, more efficient workspace.
How Do You Store Multiple Drills Without Clutter?
The best way to store multiple drills is to assign each tool a specific location and keep its accessories nearby. Instead of stacking drills in a drawer or leaving them scattered across a workbench, choose a rack, cabinet, shelf, or charging station that suits your collection.
Start by grouping drills according to their type, size, or frequency of use. Keep your everyday cordless drill within easy reach and place specialized models in less accessible storage. Store batteries and chargers together where practical, while keeping drill bits, driver attachments, and other small accessories in labeled containers.
Wall-mounted racks are excellent for saving floor space, while cabinets offer protection from dust. If you own several cordless tools, consider a charging station with enough room for batteries to charge without creating a tangle of cables. Measure your tools before building or purchasing storage so that handles, batteries, and attachments fit comfortably.
1. Wall-Mounted Charging Rack
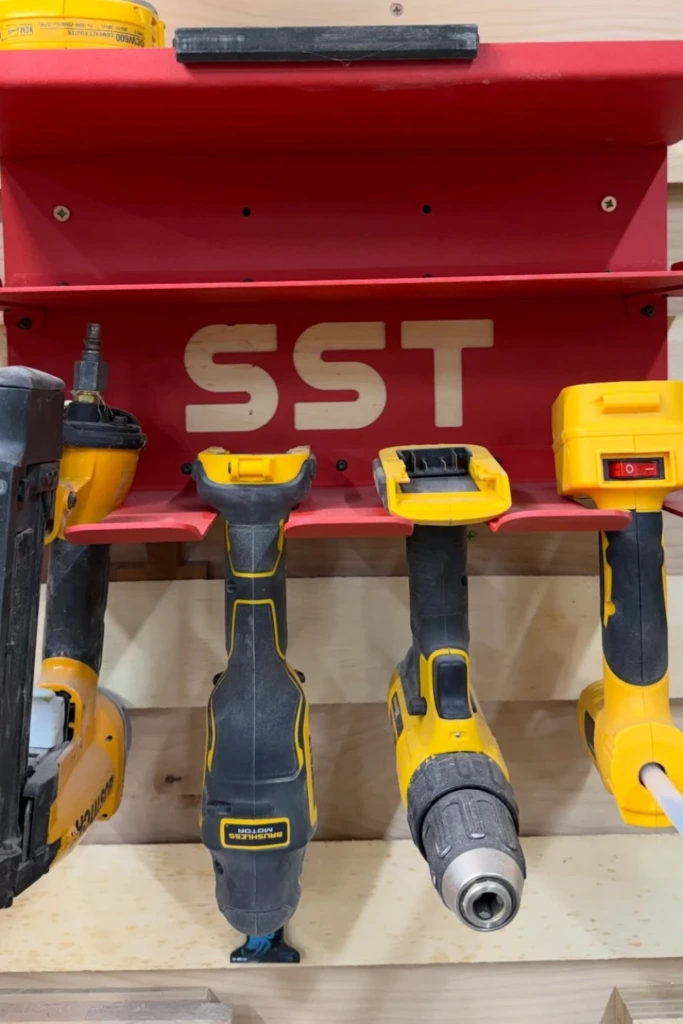
A wall-mounted charging rack combines convenient tool storage with a dedicated place for charging batteries. It is particularly useful for garages and workshops where bench space is limited.
Build the rack from sturdy plywood or purchase a compatible organizer with individual holders for each drill. Position the holders so the tools hang securely by their handles, leaving enough clearance to remove them without bumping neighboring equipment.
A narrow shelf above or beside the rack can accommodate chargers and spare batteries. Install a cable management strip or simple clips to keep charging cords organized. If you want to charge batteries directly on the rack, make sure the electrical connections and charger placement follow the manufacturers' instructions.
Secure the rack to wall studs or an appropriate masonry fixing system, especially when storing several heavy tools. A well-planned arrangement keeps drills visible, accessible, and ready for the next project.
2. Vertical Tool Cubes
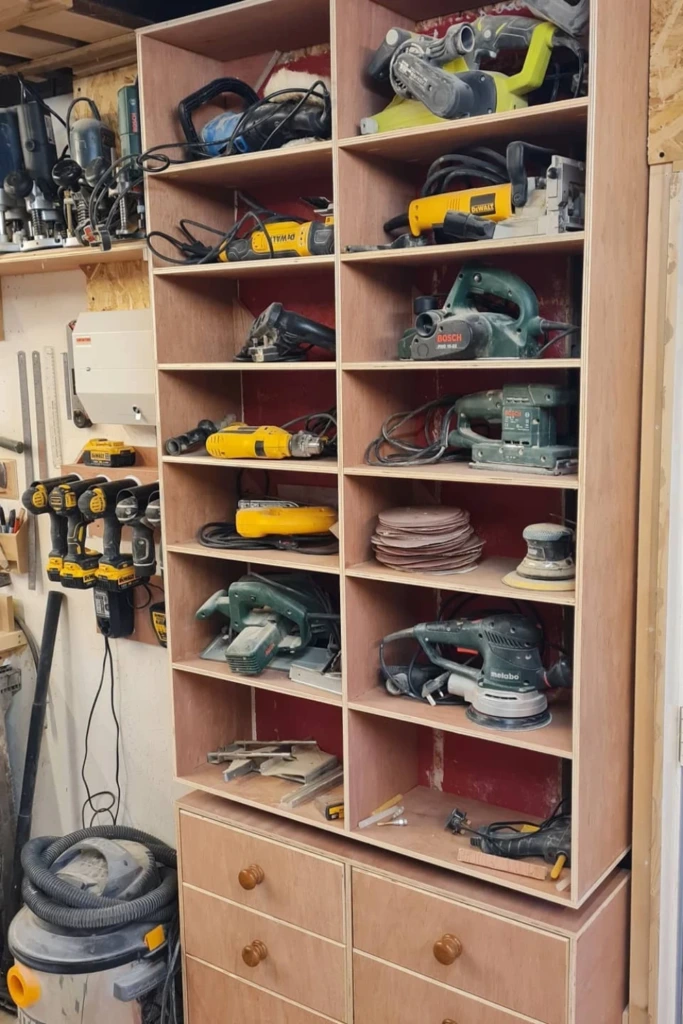
Vertical tool cubes provide individual storage compartments for drills and other handheld power tools. Their upright design makes good use of narrow spaces, making them suitable for small workshops or crowded garages.
You can build a cube organizer using plywood, hardwood, or another strong sheet material. Each compartment should be wide enough for the drill body and battery, with sufficient depth to support the tool without forcing it into position. Different-sized openings can accommodate compact drills, impact drivers, and larger cordless models.
Place frequently used tools in the most accessible compartments and reserve upper or lower sections for less common equipment. Adding labels makes it easier to return each tool to the correct spot.
For added functionality, include small drawers or bins for drill bits, screws, and driver accessories. If the organizer is tall or heavily loaded, anchor it to the wall to prevent tipping. Vertical cubes offer a tidy alternative to piling tools together on shelves.
3. Custom Drill Slots
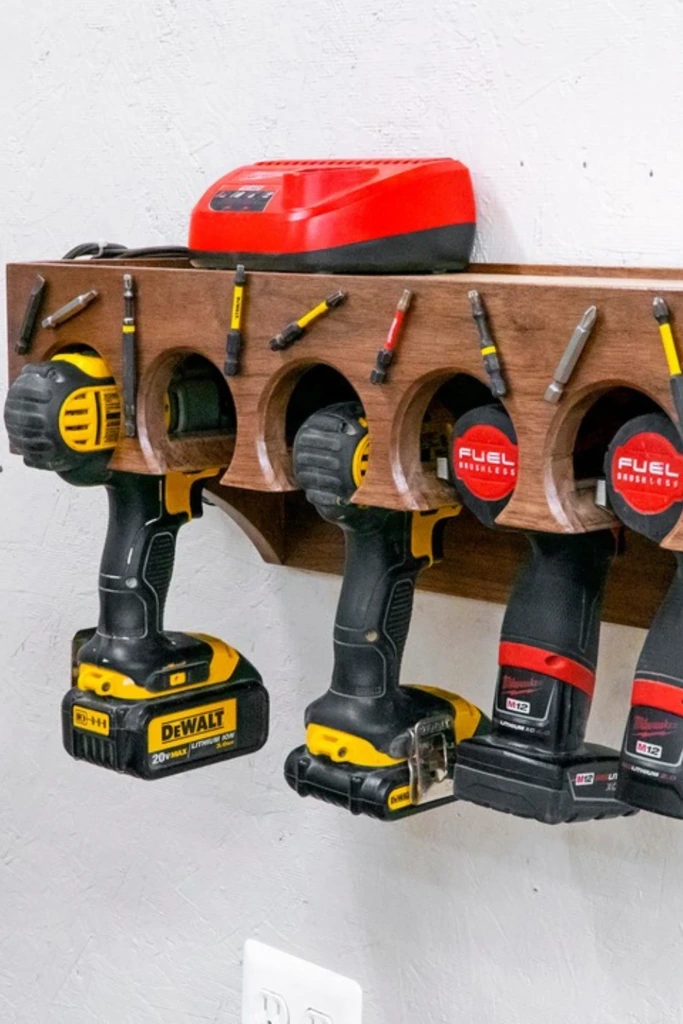
Custom drill slots allow you to design storage around the exact tools you own. This approach works especially well if you have several drills from the same manufacturer or a collection with different handle shapes and battery sizes.
Cut individual openings into a plywood panel or thick wooden rack so each drill can rest securely in its own space. Measure the handle, body, and battery before cutting, and leave a little extra clearance for easy removal. Rounded edges and smooth sanding help prevent splinters and make the rack more comfortable to use.
You can arrange the slots horizontally along a wall or incorporate them into a freestanding cabinet. Angled slots may make handles easier to grab, provided the tools remain securely supported.
Before making permanent cuts, test the layout with cardboard templates. This simple step helps you check spacing and avoid wasting material. Custom slots create a fitted, organized appearance while reducing the chance of tools knocking against each other.
4. Plywood Charging Station
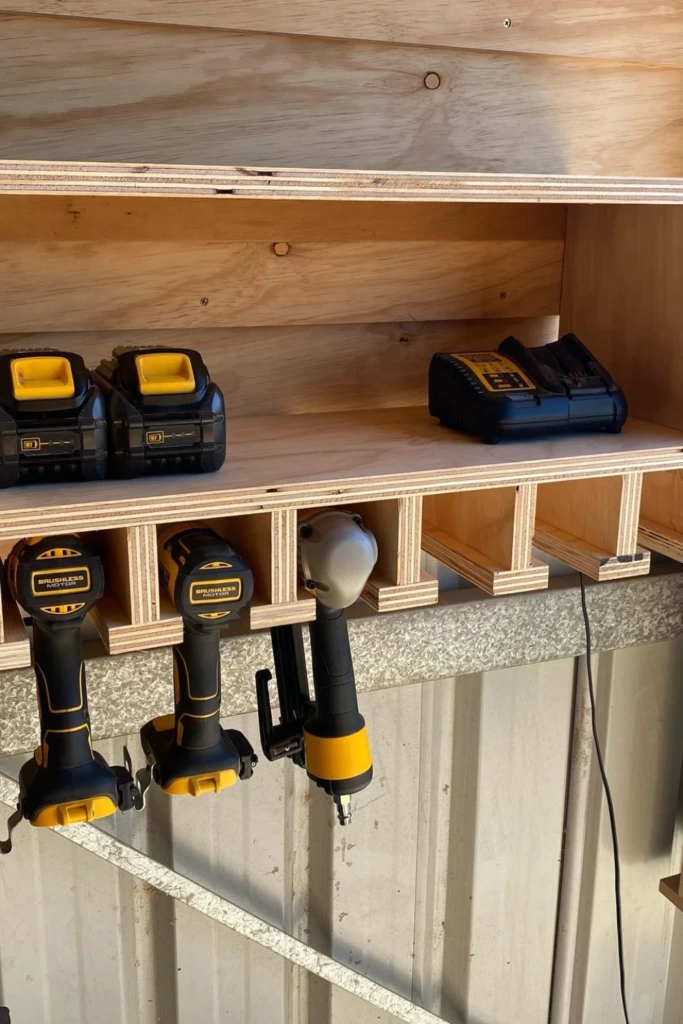
A plywood charging station is a practical DIY project for anyone who wants to keep cordless drills, chargers, and spare batteries in one location. Plywood is relatively affordable, easy to work with, and suitable for a wide range of workshop layouts.
Begin with a sturdy base or wall panel, then add drill holders, a charger shelf, and compartments for accessories. Use plywood thick enough to support your tools, and reinforce joints where necessary. Sand exposed edges to produce a clean finish and reduce the risk of splinters.
Plan the charger positions before assembling the station. Each charger needs enough space for ventilation, and batteries should remain easy to remove. Route cables along the back or side using suitable clips, keeping them away from sharp edges and moving tools.
You can customize the station with labeled battery compartments, a small drawer for drill bits, or a shelf for instruction manuals. A protective finish can help the wood withstand workshop dust and occasional handling.
For a wall-mounted version, attach the station securely to structural supports. A freestanding model should have a stable base and enough depth to prevent tipping.
5. Full Wall Organizer
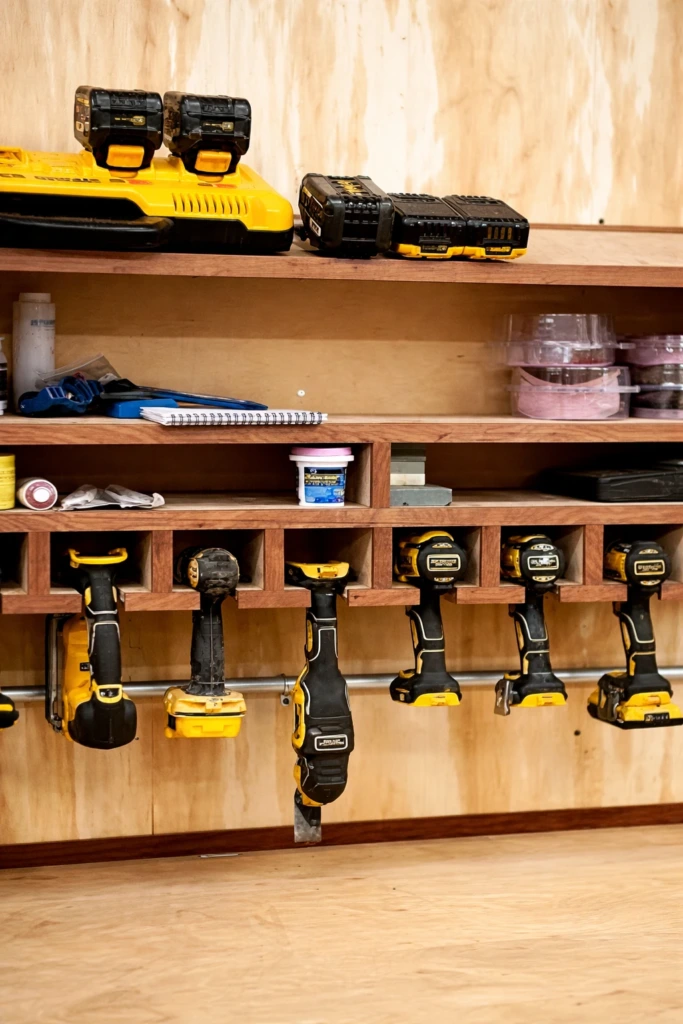
A full wall organizer turns an otherwise unused workshop wall into a dedicated storage area for drills, chargers, batteries, and accessories. It is a good option for people with extensive tool collections who want everything visible and easy to locate.
Start by dividing the wall into functional zones. Keep drills and impact drivers in one section, charging equipment in another, and small accessories in labeled bins. Shelves can hold tool cases, while hooks or purpose-built holders accommodate frequently used equipment.
A plywood backboard offers a straightforward foundation for mounting custom racks. Alternatively, a compatible slatwall or modular panel system allows you to reposition holders as your collection changes.
Before installation, check the wall construction and choose fasteners suitable for the combined weight of the tools and organizer. Avoid mounting heavy equipment to unsupported drywall alone.
Leave enough open space around each drill to remove it comfortably. A clear workbench beneath the organizer can provide a convenient place for changing bits or preparing materials. The result is a workshop wall that supports an efficient workflow rather than simply displaying tools.
6. Compact Wall Cabinet
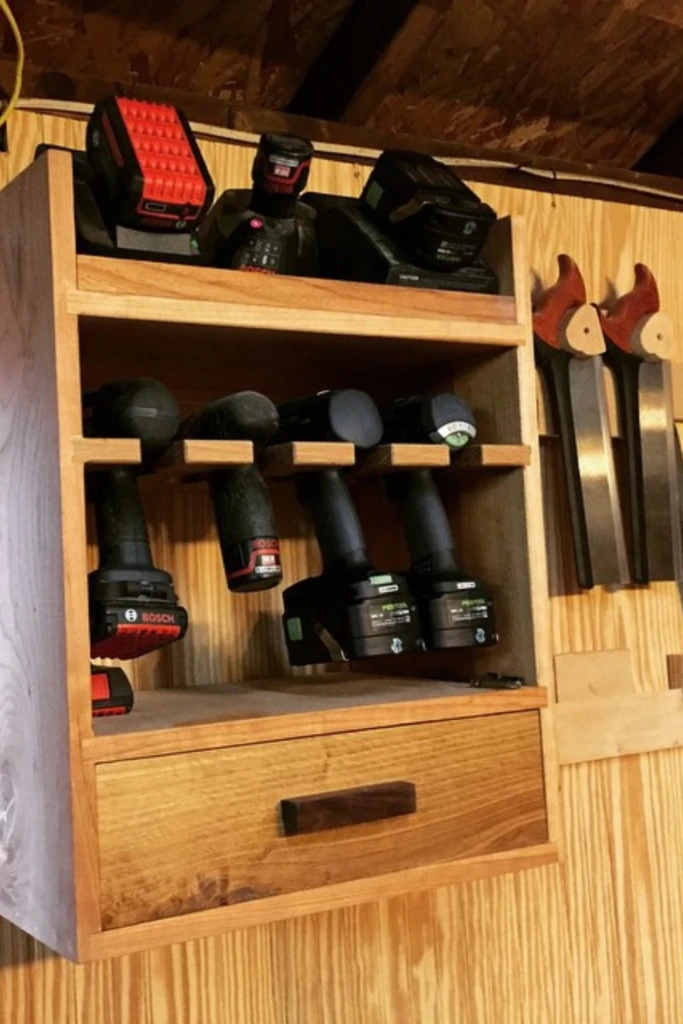
A compact wall cabinet is ideal when you want to keep drills organized without leaving them exposed to dust or workshop clutter. It works particularly well in shared garages, utility rooms, and small home workshops.
Choose a cabinet with enough internal depth for your largest drill, including its battery. Adjustable shelves allow you to change the layout as your equipment collection grows, while a lower compartment can accommodate chargers and spare batteries.
For easier access, install small holders inside the cabinet door for drill bits and driver attachments. Shallow bins can keep batteries separated, and labels help you identify equipment quickly.
Ventilation deserves attention if you intend to charge batteries inside the cabinet. Do not enclose operating chargers in a sealed space; follow their instructions for clearance and airflow. If ventilation cannot be provided safely, use the cabinet for storage and place the charging equipment on an open shelf nearby.
Mount the cabinet to suitable structural supports and avoid overloading its shelves. A compact cabinet keeps the workshop looking tidy while protecting tools from everyday dust and accidental knocks.
7. Bench-Top Storage Unit
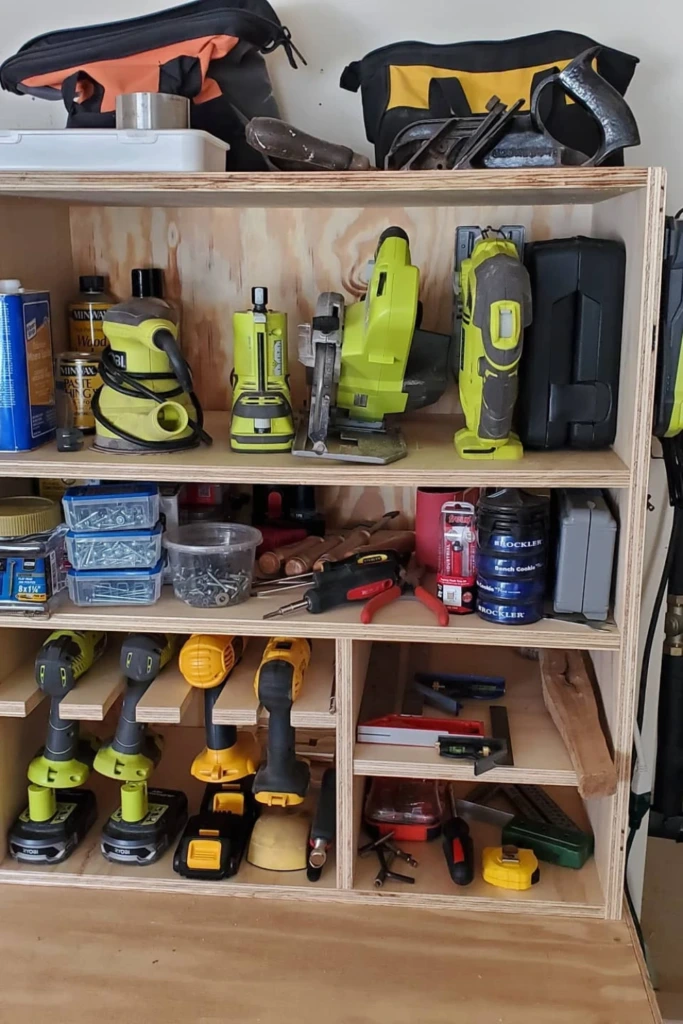
A bench-top storage unit keeps drills within arm's reach while you work. Unlike wall-mounted organizers, it can sit directly on an existing workbench and move with you if your workshop layout changes.
Build a low-profile unit with upright drill holders, a rear section for chargers, and small compartments for commonly used accessories. Make sure the base is wide and stable enough to support the tools without wobbling. Non-slip feet can help keep the unit from sliding across a smooth work surface.
Arrange drills according to how often you use them. Your main cordless drill and impact driver should be easiest to grab, while occasional-use tools can occupy the rear positions.
To prevent overcrowding, measure the available bench area before building. The organizer should not interfere with cutting, assembly, or other tasks. If your workbench doubles as a tool-preparation area, choose a compact design that leaves enough clear space for projects.
A bench-top unit is particularly useful for hobbyists who prefer an organized, portable setup without drilling into their workshop walls.
8. Open Shelf System
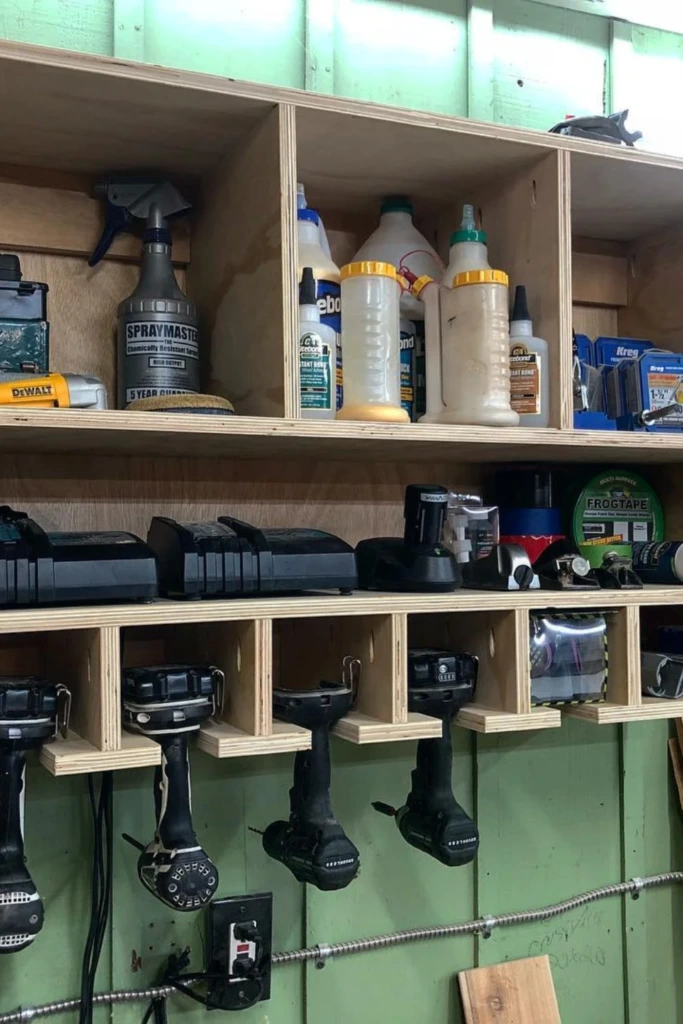
An open shelf system provides flexible storage for drills, chargers, battery packs, and tool cases. It is easy to customize and can be expanded as your collection grows.
Choose shelves strong enough to support the combined weight of your equipment. Deeper shelves may accommodate large cases, while narrower tiers can hold individual drills and accessories. Use separate bins for drill bits, screws, and other small items to prevent them from spreading across the shelf.
Place heavier tools on lower shelves to improve stability and reduce the risk of dropping them. Frequently used equipment should remain at a comfortable height, while spare accessories can occupy higher positions.
You can add dividers to separate individual drills and stop them from sliding into one another. A labeled container for each tool category makes cleanup faster, especially when multiple people share the workshop.
Open shelves provide less protection from dust than enclosed cabinets, so occasional cleaning may be necessary. Store tools in their cases or use suitable covers if your workshop produces substantial sawdust or debris.
9. Minimal Slot Rack
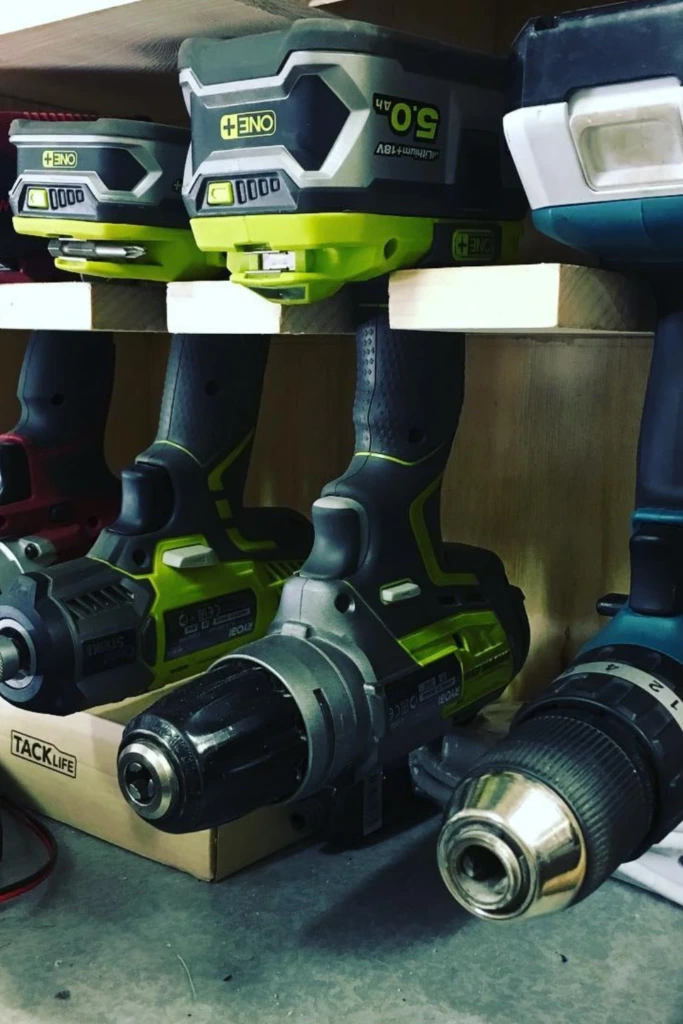
A minimal slot rack is a simple storage solution for people who want to organize several drills without building a large cabinet or complex workstation. Its compact design typically consists of a horizontal support with individual openings or holders for tool handles.
Wood is a popular material for a DIY rack because it is easy to cut and customize. Measure each drill before creating the slots, paying attention to handle thickness and the clearance required around the battery. Sand the openings carefully so the tools can slide in and out without catching.
Mount the rack at a height that allows you to lift each drill out naturally. Leave sufficient space between holders to avoid collisions, particularly if your drills have bulky battery packs.
For a more organized setup, install a narrow shelf above the rack for chargers or a small accessory container. The rack can also be labeled to make returning tools to their proper positions easier.
Because a minimal rack offers little protection from dust, it is best suited to reasonably clean workshops. Its main advantage is straightforward access with very little wasted space.
10. Narrow Drill Tower
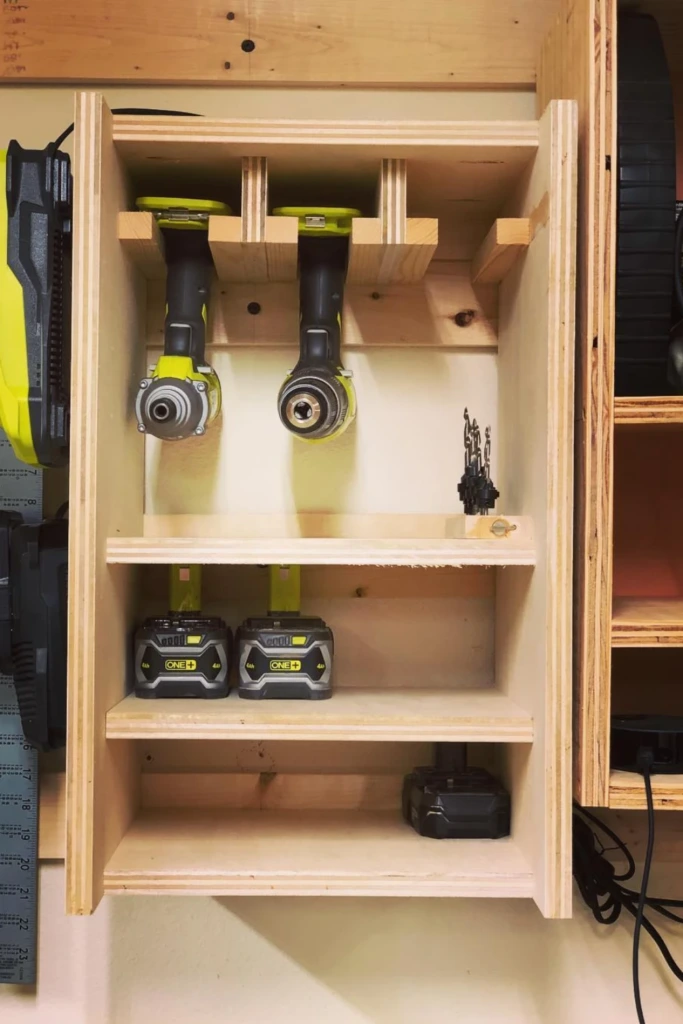
A narrow drill tower uses vertical space to store several tools within a small floor area. This design is useful when a workshop has limited wall space or when you want a freestanding organizer that can be positioned beside a workbench.
Build the tower with a solid base, vertical supports, and multiple levels of drill holders. Each level should support the tools securely without allowing them to slide out. Arrange the openings so that handles remain easy to grasp and batteries do not collide with neighboring drills.
A wider base and proper anchoring improve stability, especially when the tower is tall. Avoid placing all the heaviest equipment at the top, as this can make the unit less stable.
You can incorporate a small shelf near the bottom for spare batteries or a bin for drill bits. If you intend to include chargers, provide appropriate airflow and manage the cords so they cannot become tangled around the tools.
A drill tower is most effective when it is designed around the actual dimensions of your collection rather than built to a generic size.
11. Compact Plywood Station
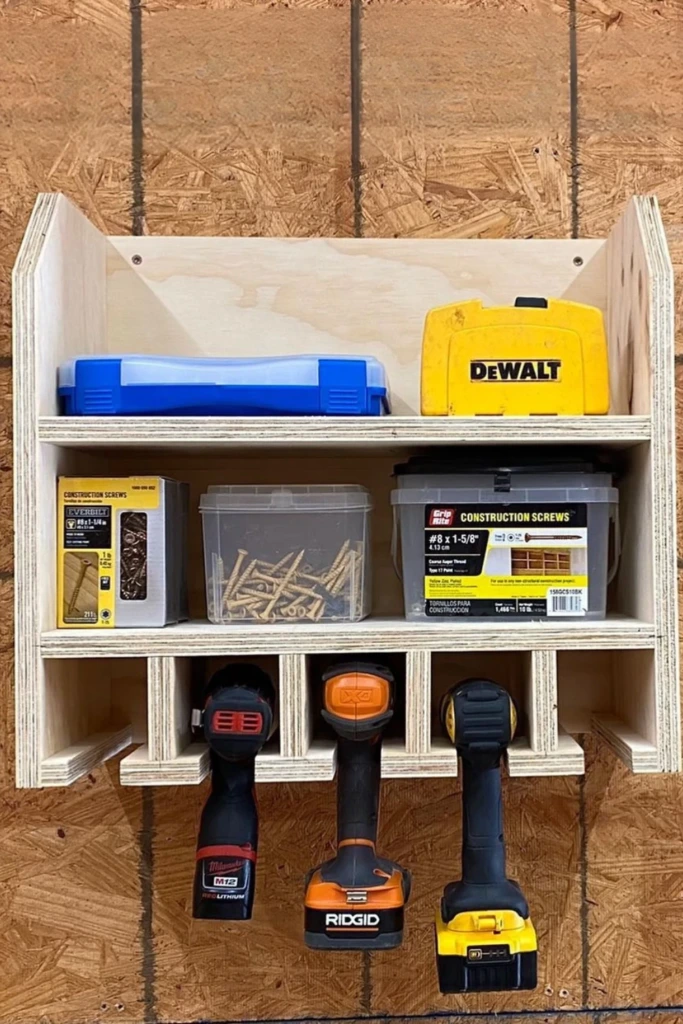
A compact plywood station offers many of the benefits of a larger tool organizer without taking over the workshop. It is suitable for apartment DIY corners, small garages, and hobby workspaces where every inch matters.
Create a small frame with individual drill holders, a shallow shelf for chargers, and a drawer or removable bin for accessories. Use accurate measurements to ensure that the drills fit without wasting space. If you have only two or three tools, a simple holder and one shelf may be all you need.
The station can be mounted on a wall or placed on a stable workbench. A wall-mounted design frees up the work surface, while a bench-top version is easier to relocate.
Keep the layout simple enough that you can remove and replace tools with one hand. Leave charger ventilation space, and avoid storing loose screws or metal bits where they could fall into electrical equipment.
Seal or paint the plywood if you want a finished appearance and easier cleaning. This is a practical project for anyone who wants a personalized storage solution without using a large amount of material.
12. PVC Pipe Holders
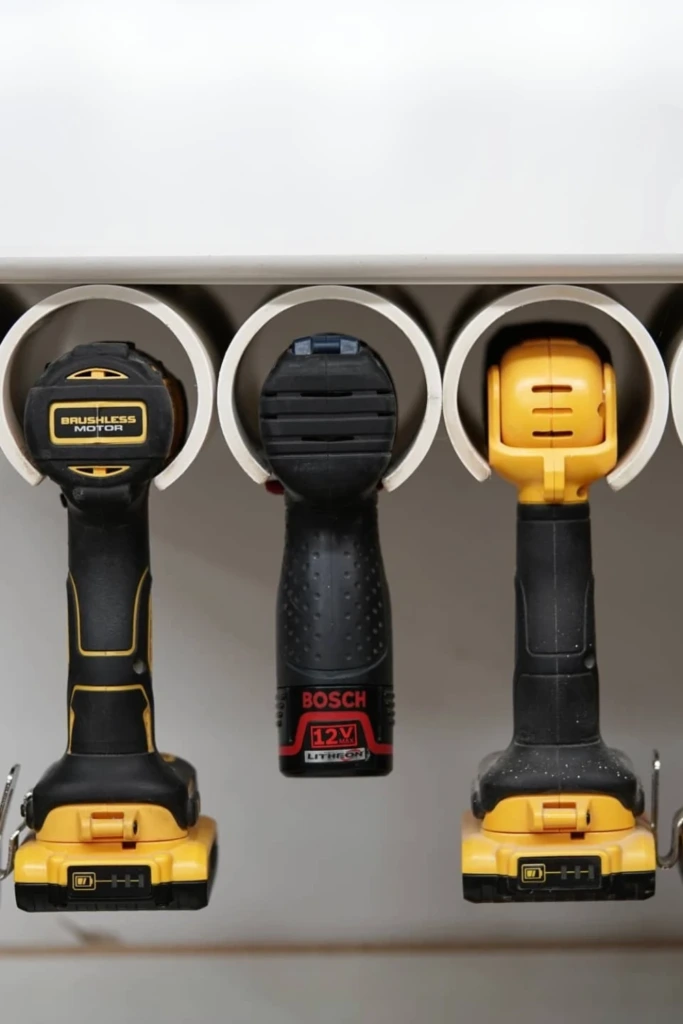
PVC pipe holders offer an inexpensive way to create individual compartments for drills or certain cordless tools. Short sections of appropriately sized pipe can be attached to a sturdy backing board to form a row of tool cradles.
Before cutting anything, compare the pipe diameter with the part of the tool you intend to support. PVC holders are not universally suitable for every drill, and a pipe that is too narrow may grip the tool too tightly or fail to support it securely.
Cut each section to a suitable length and smooth the edges thoroughly. Secure the pieces with fasteners or an appropriate adhesive compatible with the materials, following the product instructions. Attach the finished holder assembly to a wall or stable support capable of carrying the load.
Test each compartment with the tool before filling the rack. The drill should remain secure but come out without excessive force. If the tool has an awkward shape or a heavy battery, a purpose-built handle holder may be a safer option.
PVC pipe organizers work best as simple, lightweight storage rather than as a substitute for a properly designed charging station.
13. Dedicated Charger Shelf
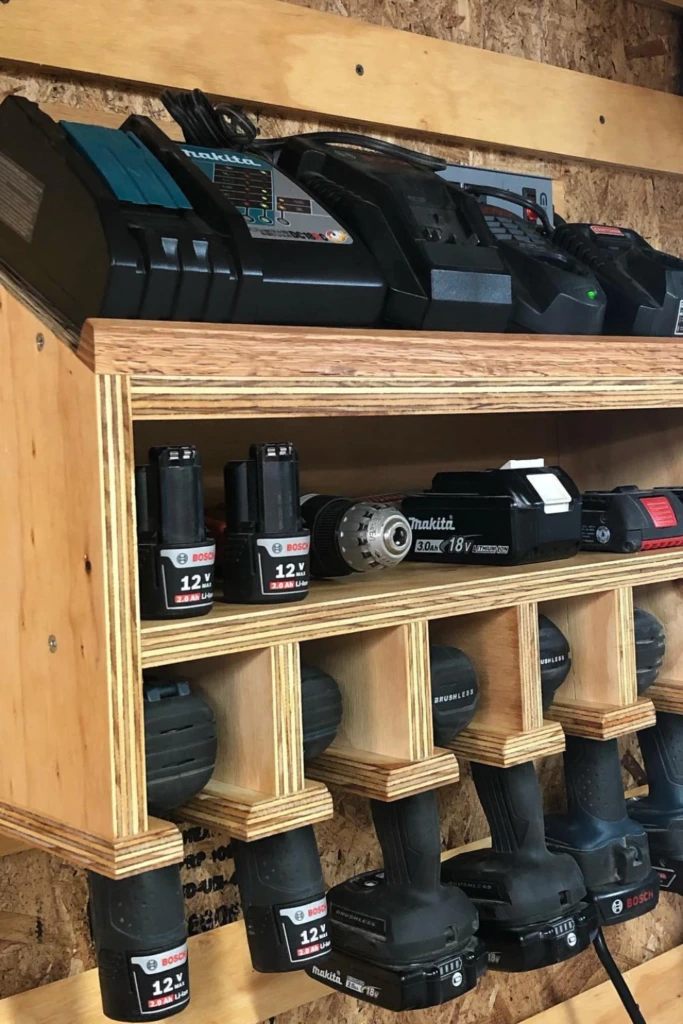
A dedicated charger shelf keeps battery chargers, spare batteries, and charging cables organized in one accessible location. Separating charging equipment from the main tool rack can also make it easier to manage cords and keep the workbench clear.
Choose a shelf with enough surface area for your chargers, leaving space between units where required by their manufacturers. Position it near your drill storage so that you can move batteries between the tools and chargers conveniently.
Cable clips or a mounted cable organizer can prevent cords from hanging across the work area. Keep plugs and connectors away from sharp metal objects, liquids, and places where they might be crushed.
Place spare batteries in designated locations rather than stacking them randomly. Follow the battery manufacturer's instructions for charging, temperature, storage, and handling. Damaged batteries should not be charged or stored alongside ordinary equipment.
Mount the shelf securely and avoid overloading it with heavy chargers or battery packs. A well-arranged charging area makes it easier to see which batteries are ready for use and helps keep electrical accessories under control.
14. Built-In Charging Bay
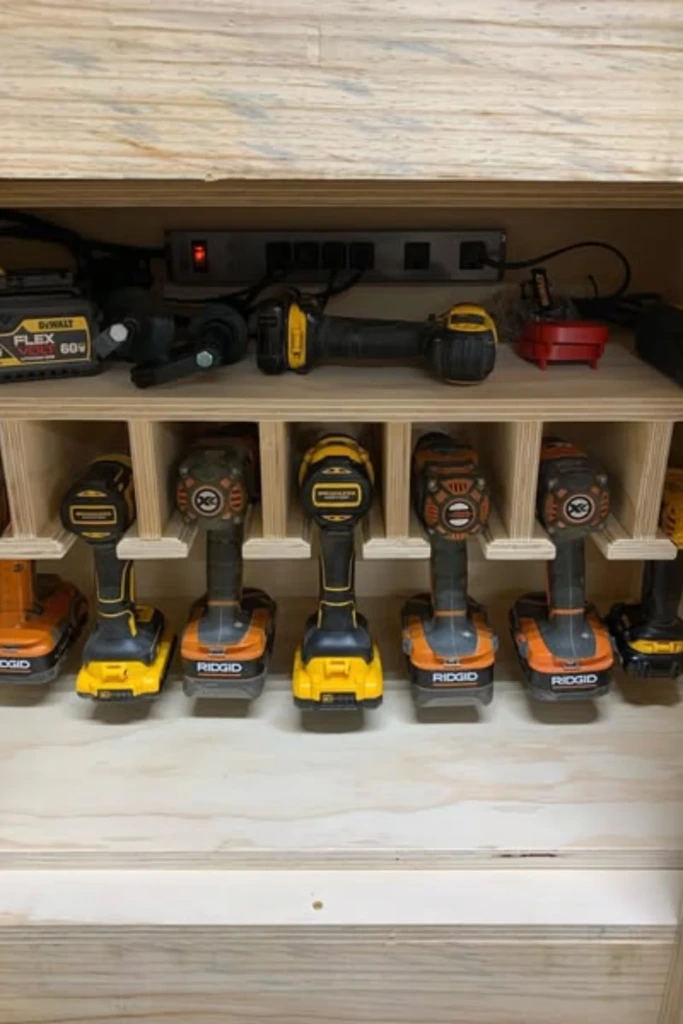
A built-in charging bay integrates charging equipment directly into a tool cabinet, workbench, or custom storage station. It creates a dedicated home for batteries while keeping chargers close to the drills they power.
Design the bay around the dimensions of your chargers and the number of batteries you typically use. A divided shelf can prevent batteries from being mixed together, while a nearby rack keeps the corresponding drills easy to access.
Ventilation is essential. Chargers can generate heat during operation, so avoid placing them in tightly enclosed compartments without suitable airflow. Follow the manufacturers' clearance requirements and do not cover ventilation openings.
Plan the cable route before assembling the bay. Use suitable clips to secure cords, prevent pinching, and keep electrical connections away from sharp edges. Any mains-powered equipment should be installed and used according to applicable electrical safety requirements.
For a simpler alternative, create an open charging bay with a back panel and a shelf rather than a fully enclosed compartment. This approach offers organization while making chargers easier to inspect and providing better access to airflow.
15. Floor-to-Ceiling Cabinet
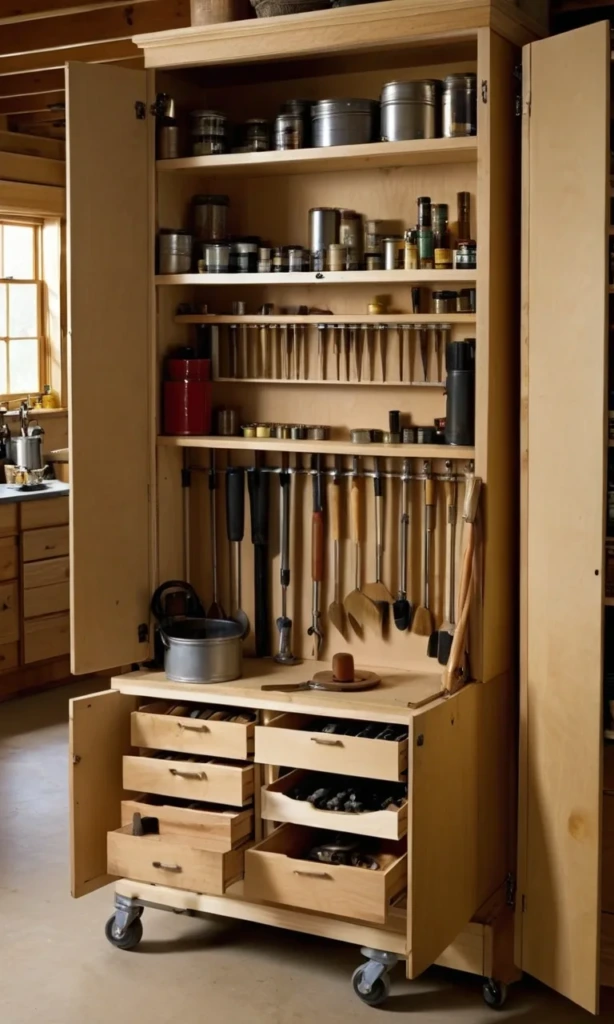
A floor-to-ceiling cabinet takes advantage of vertical storage space and can accommodate a large drill collection along with cases, accessories, and other workshop equipment. It is particularly useful when you want to keep tools concealed and reduce visual clutter.
Divide the cabinet into practical sections. Lower shelves can hold heavier tool cases and spare equipment, middle shelves can store frequently used drills, and upper shelves can accommodate lightweight items that you need less often.
Adjustable shelving provides flexibility if your collection changes. You can also add dedicated holders inside the cabinet for drills, along with small drawers or bins for bits and attachments.
Tall cabinets must be secured against tipping. Attach the unit to suitable structural supports according to the manufacturer's instructions, and avoid storing heavy items overhead where possible. Keep frequently used tools at a comfortable lifting height to reduce strain.
If the cabinet includes a charging area, provide adequate ventilation and safe cable routing. Alternatively, reserve the cabinet for storage and use a separate open shelf for charging.
A well-planned tall cabinet can combine substantial capacity with a clean, streamlined workshop appearance.
FAQs
Choosing the right drill storage system depends on the number of tools you own, the space available, and whether you need to charge batteries where you store them. A small wall rack may be enough for a basic DIY setup, while a cabinet or integrated station can work better for a larger collection.
The following answers address two common questions about storing and mounting drills.
Can You Store Drills With Batteries Attached?
Yes, you can generally store cordless drills with their batteries attached, provided the tools and batteries are in good condition and the manufacturers' storage instructions allow it. Keeping batteries connected can make tools quicker to pick up and use, especially when they are stored in individual holders.
However, consider the storage environment. Keep drills away from excessive heat, moisture, direct sunlight, and conductive debris that could contact exposed battery terminals. Make sure each tool is switched off and cannot be activated accidentally while stored.
For long-term storage, consult the battery manufacturer's guidance. Some manufacturers recommend removing the battery from the tool, particularly when the equipment will remain unused for an extended period. Store spare batteries in a suitable location where metal objects cannot bridge their terminals.
Do not leave batteries charging unattended unless the manufacturer specifically permits that practice, and avoid charging damaged, swollen, or unusually hot battery packs. Use compatible chargers and follow the recommended charging procedure.
For everyday convenience, a drill rack with batteries attached can work well. For extended storage, follow the instructions supplied with your particular drill and battery system.
What’s the Best Height to Mount a Drill Rack?
The best height depends on your own reach, the rack design, and the size of the drills. As a practical starting point, position the main row of holders around waist to chest height so you can lift tools out without stretching or bending excessively.
For many standing adults, a rack with its tool handles roughly 36 to 54 inches above the floor can be a useful starting range. This is not a fixed rule: adjust the height to your body, the tool dimensions, and whether you will access the rack while standing or seated.
If the rack is above a workbench, make sure the drills can be removed without striking the bench surface. Leave enough vertical clearance for the full motion required to lift each tool from its holder.
Place frequently used drills in the most accessible positions. Reserve higher locations for lightweight accessories or tools used occasionally, and avoid mounting heavy drills above shoulder level if you can use a lower position instead.
Always secure the rack to suitable wall supports and use fasteners rated for the expected load. Before loading every holder, test the installation with a single tool and confirm that the rack remains stable.
Final Thoughts
An organized drill storage system makes workshop tasks easier by keeping tools accessible, accessories contained, and charging equipment in a designated place. Wall racks, custom slots, plywood stations, PVC holders, and full-height cabinets all offer useful solutions for different spaces and budgets.
Choose a design that matches your tool collection, measure carefully before building, and prioritize secure mounting, comfortable access, and proper battery handling. With a little planning, even a small workshop can have a dependable storage setup that keeps every drill ready for its next job.