
11 Thanksgiving Crafts for Kids for 2026
Thanksgiving week has a way of filling the house with noise, cooking smells and kids who are buzzing with energy long before the meal is ready. A good craft table gives that energy somewhere to go, and it turns the waiting into something the whole family can enjoy.
The projects below lean on supplies most homes already have: paper plates, toilet roll tubes, paint, cotton balls, leaves from the yard and a few googly eyes. Some are quick enough for toddlers with a grown-up nearby, while others give school-age kids room to add their own details.
Several of them also double as table decorations, so the crafts made on Wednesday can end up next to the turkey on Thursday.
Thanksgiving Crafts for Kids
Each idea lists what makes it work and how to keep it simple. Set out the supplies on a washable cloth or an old sheet, keep wipes close by, and let children make choices about colors and details. The finished pieces will look different from the photos, and that is exactly how it should be.
Jump to section (11)
- Thankful Tree (with 2-Ingredient Clay Dough Leaves)
- Thankful Turkey (Paper Plate Craft)
- Fall Leaf Napkin Rings
- Footprint Turkeys
- Paper Plate Turkeys
- Toilet Roll and Paint Chip Turkey
- Painted Rock Turkey
- Wine Cork Turkeys
- CD Turkey
- Pumpkin Pie Craft with Puffy “Whipped Cream”
- Scented Pumpkin Pie Craft with Cotton Ball Whipped Cream
Thankful Tree (with 2-Ingredient Clay Dough Leaves)

A thankful tree is a centerpiece that grows over the whole holiday. Gather a few bare branches from the yard and stand them in a vase or a jar filled with pebbles so they stay upright.
For the leaves, mix baking soda and cornstarch with water over low heat until it forms a soft dough, then let it cool. Kids roll it flat, press out leaf shapes with a cookie cutter, and poke a small hole near the top for string. Once the leaves dry, they can be painted in fall shades of red, orange and gold.
The meaningful part comes at the end. Each person writes one thing they are grateful for on a leaf with a marker, and the leaves are hung on the branches. It makes a lovely talking point at the dinner table, and the clay leaves can be saved and reused next year.
Thankful Turkey (Paper Plate Craft)

This turkey turns gratitude into feathers. Paint a paper plate in bright sunset colors, let it dry, and cut it into wide feather-shaped wedges that fan out like a tail.
Before the feathers are glued in place, children write or draw something they are thankful for on each one: a pet, a friend, a favorite food, a fun place. Younger kids can dictate while a grown-up writes.
For the body, a cardboard tube or a brown paper oval works well. Add googly eyes, a small orange triangle beak and a red tissue paper wattle. Stand it on the table or tape it to the front door to welcome guests.
Fall Leaf Napkin Rings

Napkin rings are a simple way to let kids contribute to the table setting. Cut cardboard tubes into short rings, about one and a half inches wide, and wrap them in brown or cream paper or ribbon.
Next, add leaves. Children can cut leaf shapes from patterned cardstock or trace real leaves they collected outside. Two or three overlapping leaves on each ring look full and festive.
Slide a cloth napkin through each ring and place one at every seat. If the kids write a guest’s name on a leaf, the rings work as place cards too.
Footprint Turkeys
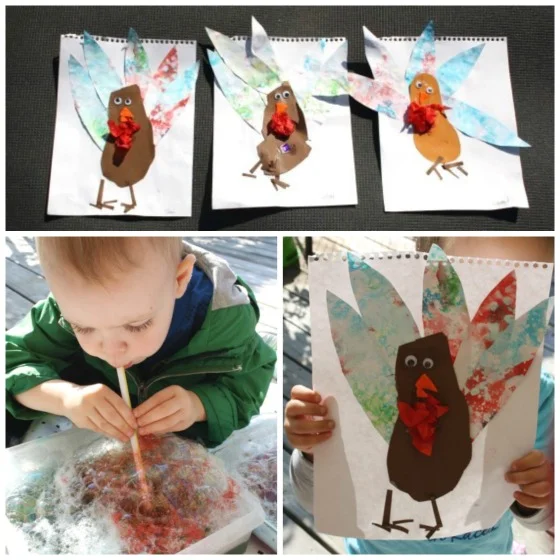
This version uses a straw and watery paint to create colorful, splashy feathers. Drop small puddles of diluted paint onto white cardstock and let children blow through a straw to push the paint across the paper in wild streaks.
Once the feather sheet dries, cut it into tail shapes and glue them behind a brown body. A footprint or a simple oval cut from brown paper makes a sweet body, and it turns the craft into a keepsake that shows how small their feet were that year.
Blow painting is great for building breath control and it never turns out the same twice, so expect a lot of giggles and some very unique turkeys.
Paper Plate Turkeys
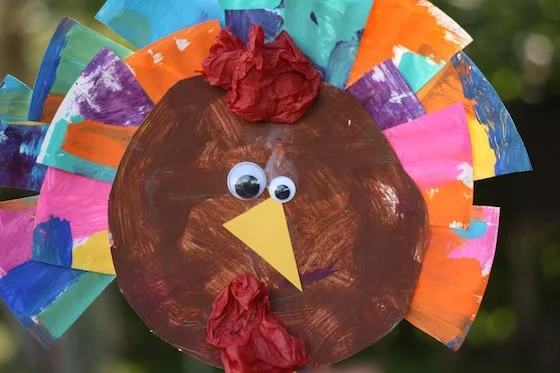
The classic paper plate turkey is popular for a reason. Paint the center of a plate brown and let children paint a second plate in rainbow stripes or blotches for the tail.
Cut the colorful plate into feathers or simply snip around its edge to create a fringe, then glue the brown plate in front. Add googly eyes, a yellow paper beak and a crumpled red tissue wattle.
Because the shapes are large, this is an easy project for preschoolers who are still learning to use scissors and glue.
Toilet Roll and Paint Chip Turkey

Paint chip samples from the hardware store make perfect ready-made feathers. Choose a handful in soft pastels or bold fall shades and trim the tops into rounded feather tips.
Paint or wrap a toilet roll tube in brown paper for the body. Glue the paint chips to the back of the tube in a fan, then add eyes, a beak and a little red wattle.
These turkeys stand on their own, so they work nicely as small decorations on a windowsill, a mantel or a kids’ table.
Painted Rock Turkey

Smooth, flat rocks are wonderful for little painters. Find one about the size of a child’s palm, wash it and let it dry before painting it brown.
Real feathers from the craft store give this turkey a fluffy tail. Glue them to the back of the rock with a low-temperature glue gun or strong craft glue, then add eyes, a paper beak and a red tissue snood.
Rock turkeys make sturdy paperweights and long-lasting decorations. Kids often want to make a whole family of them.
Wine Cork Turkeys
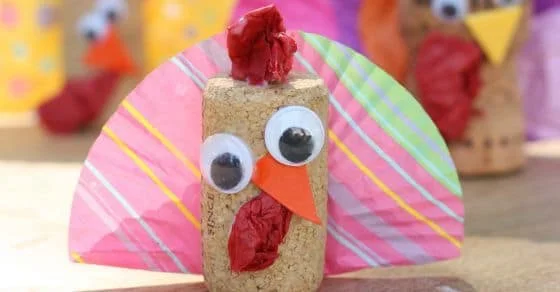
If you have a few corks saved, they make charming little turkeys. Stand a cork on its end and glue on tiny googly eyes, a paper beak and a red tissue wattle.
For the tail, cut a half circle from patterned scrapbook paper or cardstock and glue it to the back of the cork. Striped or polka dot paper looks especially playful.
These mini turkeys can hold place cards if you cut a small slit in the top of the cork. They are quick to make, so older kids can produce a set for every guest.
CD Turkey

Old scratched CDs finally have a new purpose. Cover one side of a disc with brown paint or brown paper to create the round body.
Glue colorful craft feathers around the back edge so they fan out. Add large googly eyes, a yellow triangle beak and a red wattle made from a strip of felt or a deflated red balloon.
The shiny CD shows through the feathers in places and catches the light, which kids love. Punch a hole near the top to hang it on a door or in a window.
Pumpkin Pie Craft with Puffy “Whipped Cream”

This pie is pure sensory fun. Cut a brown paper plate or cardboard circle into wedges so it looks like slices, then paint each slice a pumpkin orange.
For the whipped cream, mix equal parts white glue and shaving cream. It creates a fluffy paint that holds its shape and dries puffy. Children dollop it on top of each slice with a spoon or a craft stick.
Set the slices on a foil pie plate once they are dry for a convincing display. Just remind little ones that this pie is for looking, not eating.
Scented Pumpkin Pie Craft with Cotton Ball Whipped Cream


Add a cozy smell to the classic pie craft. Stir a spoonful of pumpkin pie spice into orange paint before children brush it onto a paper plate.
Draw slice lines with a brown marker once the paint dries, then glue a fluffy cotton ball onto each slice as a dollop of whipped cream.
The spice keeps its scent for days, so this one is fun to display in the kitchen while the real pies bake.
Final Thoughts
Thanksgiving crafts give kids a part in the holiday that feels like their own. A thankful tree, a row of paper plate turkeys and a puffy pumpkin pie can make the house feel festive without much cost or effort.
Choose one or two ideas that suit your children’s ages and the time you have. Keep the focus on having fun together and on the things you are thankful for, and the finished crafts will become part of your family’s holiday memories.



One Comment